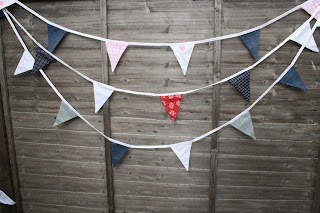
There are many different ways to make bunting; from making pinkingsheared triangles to save hemming and also using string, but I'm going to stick my neck on the line here and say they are flimsy imitations. If you are going to do it, do it right. The bunting I will show you is durable, washable and smart enough to be used at even the most formal events. The flags are two-ply so there is no right or wrong side when hung.
You will need:-
1. Fabric. Depending on the size and length of the bunting, the amount will vary. Pick at least three different fabrics for variety.
2. Cotton Tape or Bias Binding. I prefer cotton tape as it is so much cheaper. Bias binding can set you back around £1 per metre.
3. Cotton Thread.
4. Scissors.
5. Sewing machine (sewing can be done by hand, but it will take a lot longer!)
6. Iron and Ironing board.
You also need to decide the dimensions of your bunting. I personally prefer my bunting to have spacing between the flags and I tend to have around 20cm (8 inches) in between each flag for my outdoor strands.
The measurements for my flags are 18cm long and the straight bit at the top is 13cm.
Also, each strand I make is between 5-6 metres long (17-20 feet). I know that sounds really long, but once you start hanging it around the garden it gets swallowed up really quickly.
Firstly cut out a card template for the size and shap you want each flag. You will need to add about 5mm all over to allow for the hem. Use the card to mark out where to cut on the fabric. Every two triangles will make one flag, so make sure you have plenty of material.
Cut out the triangles and pin with the right sides touching each other. The flags will be sewn and turned out, so make sure you can only see the wrong side.
Sew the flag together leaving the top of the flag open. (So just the two pointy sides).
I tend to leave about a 5mm gap from the edge. This means you don't have to cut off the excess at the sides, but you may want to snip away some material from the point to make turning them inside out easier (but not too close).
Turn the flag inside out so that you now have the right side of fabric facing you. You may need to use something like a rounded chopstick to force the point out, but don't push too hard, you don't want holes. Iron the flag flat.
I use 25mm wide cotton tape. You can find this online in rolls of 25 metres for less than a tenner.
Pin the open end of your flag into the tape, turning over the top. You may need to trim the top of the flag, but it doesn't matter if it's not neat as it'll be hidden.
You can add a loop by sewing the tape on itself. This just helps with hanging the bunting.
You are now ready to hang! These are three seperate strands and you can see that I've cut up an old pair of jeans for some variety.
Why stop at outdoor bunting? Here I've made Christmas bunting. You'll need to scale down your sizes for this bunting and I've used bias binding for the strand just as it's a little neater than the cotton tape.


